Disk Operations
All the functions we designed for disks (HDD, SSD, Flash drives, or any other kinds of external disks), some of the functions are only available when conditions satisfy, some, will be available when you click on the disk, read on to know more.
Clone Disk 5.1.0+
Option available when clicking on a disk
You can use this function to
- Backup data by cloning data disk
- Migrate OS and partitions to another disk
Steps of cloning a disk:
- Plug in a new disk (SSD, HDD, or other external hard drives)
- Run Partition Expert and click on a disk, then choose Clone Disk
- First choose a source disk from the disk list v5.3.0 added
- Then choose a target disk, the one you just plugged in and click NEXT
- Delete all partitions if the connected disk is not empty and click NEXT again
- Resize the target disk or just click Next to do a complete clone (clone data and free space of the source disk)
- Then click Finish and Commit
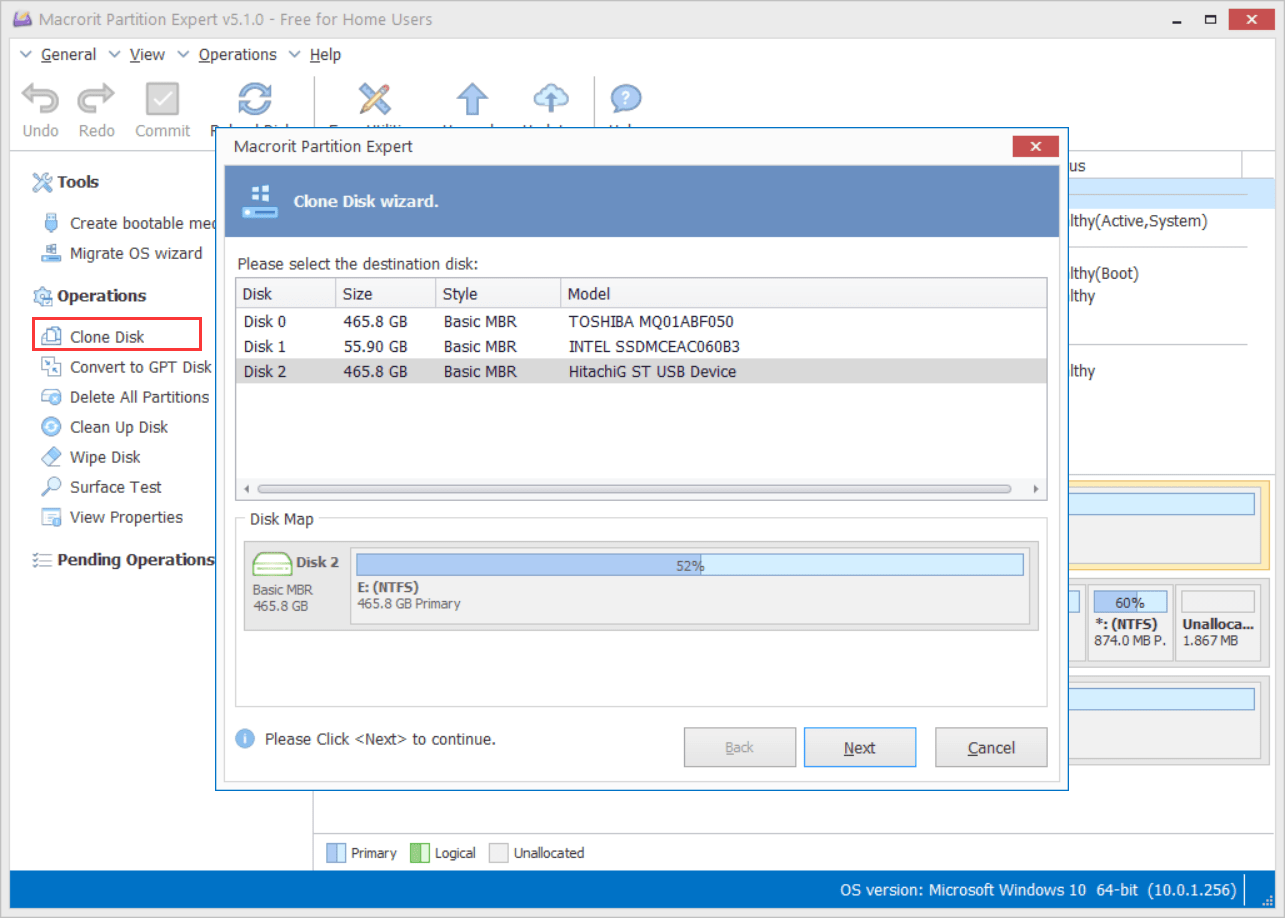
(Hover on the image to see another screen capture)
TIP
You can click on each partition on the source disk and resize it in the clone-wizard resize window, if you don't specify the target size and location, Partition Expert will clone all data and free space
Convert MBR disk to GPT
MBR disks only support 2TB capacity at most while GPT disks have no such limitations, we can use Disk Management to format a disk to GPT, but we can also use Partition Expert to convert MBR to GPT without data loss
Steps to convert to GPT disk:
- Click on a disk and choose Convert to GPT
- Click Yes to confirm and Commit to convert
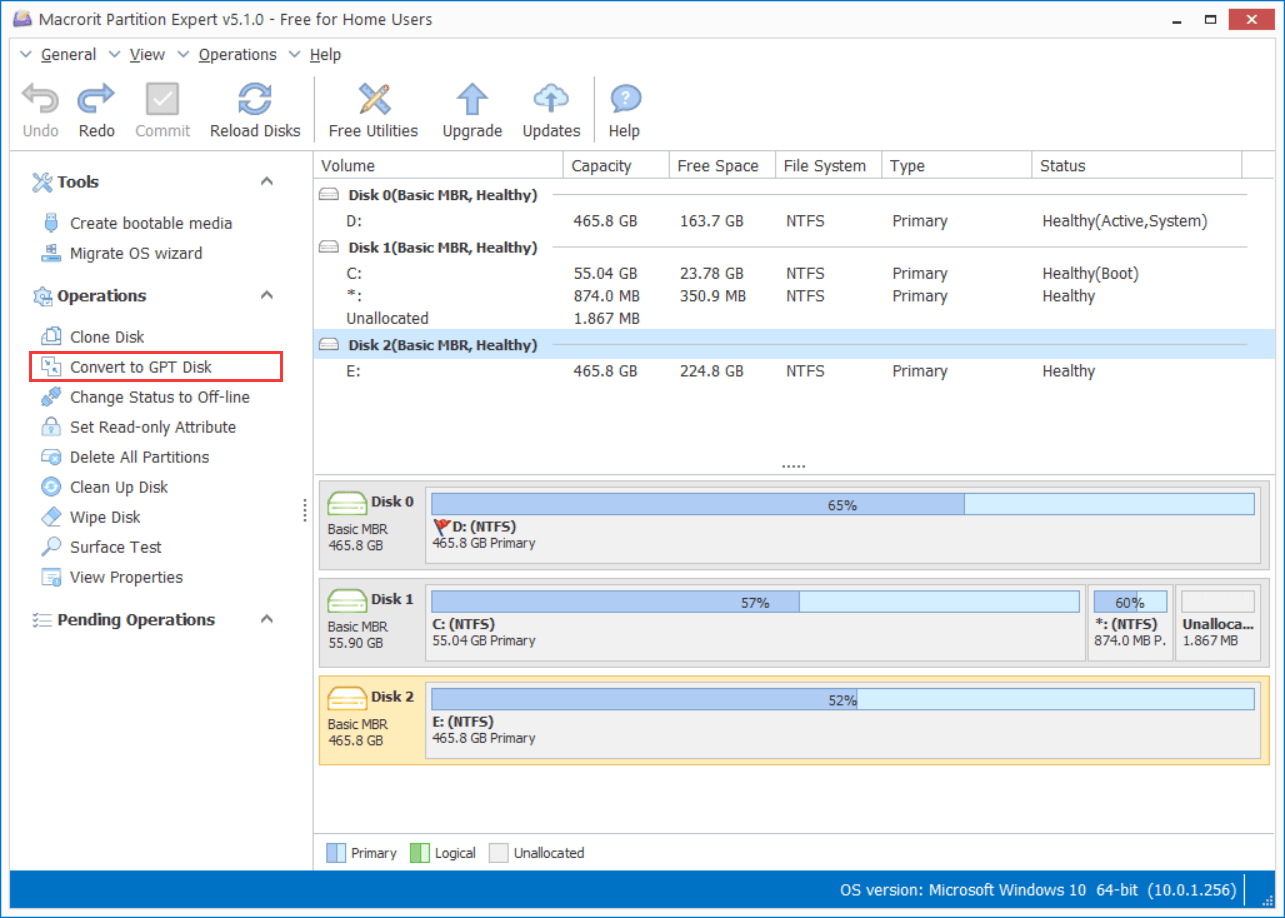
WARNING
The target disk should not contain any operating systems, click on a disk has no Windows installed you can use the convert function
Wipe Entire Disk
Available when clicking on a disk or a disk of unallocated space
Steps to wipe disk:
- Click on a disk and choose the function Wipe Disk
- Click Yes to the warning message
- Choose a wiping method from the list
- Click OK and Commit to wipe
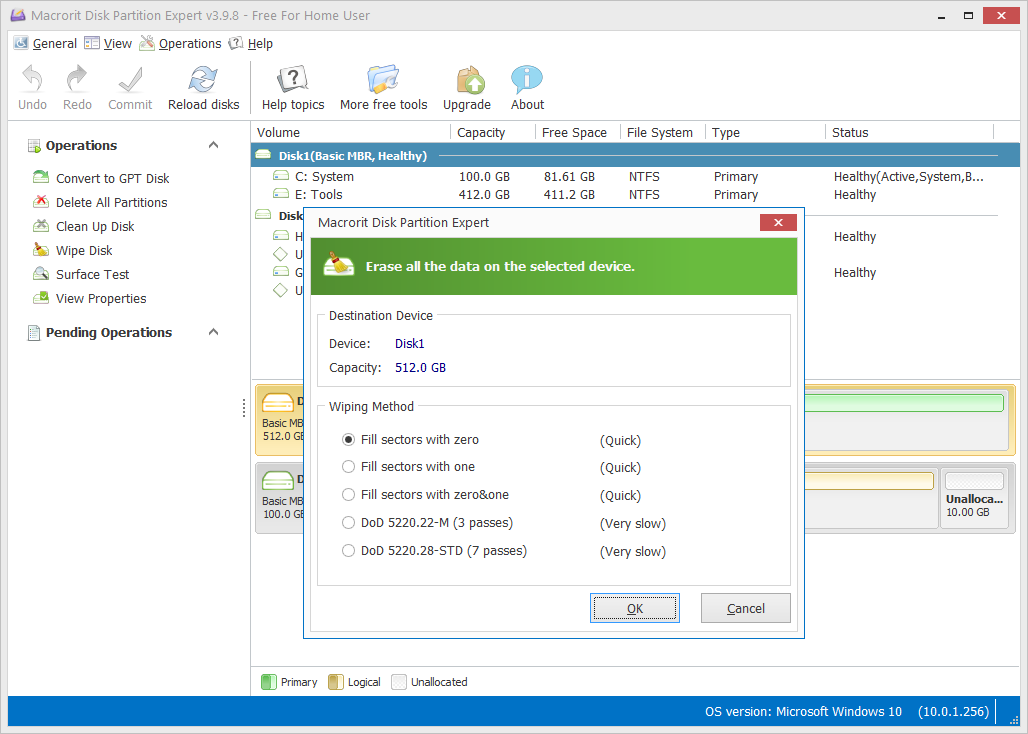
WARNING
After Wiped, nothing can be recovered even by the professional data recovery programs, all the sectors are overwritten with the standard you picked up in the wiping method section
Be sure that important stuff has a backup before wiping
Disk Surface Test
Option available when clicking on a disk
What will this function does:
- Scan physically damaged bad sectors
- Mark bad sectors as red while good sector as green
- Create a scan log after the operation completes
Steps to surface test a disk:
- Click on a disk and choose Surface Test
- Specify scan area if needed
- Click Automatic shutdown after scan if needed
- Click Scan Now to scan it
After the scan, a path to the scan log file will be displayed in the info section, you can check it to locate the bad sectors
Delete All Partitions
Want to delete all partitions at the same time? try this function
This function can be used:
- Before Cloning disk
- Before migrating OS
- Before reinstalling system
- To empty the disk
Clone and migrate functions require empty disk as the target or destination one, although they'll delete all partitions too if you proceed in their wizards, you can manually make the deletion here
Steps to delete all partitions:
- Right-click on a disk and select Delete all partitions
- Confirm Yes when prompted and click and click Commit
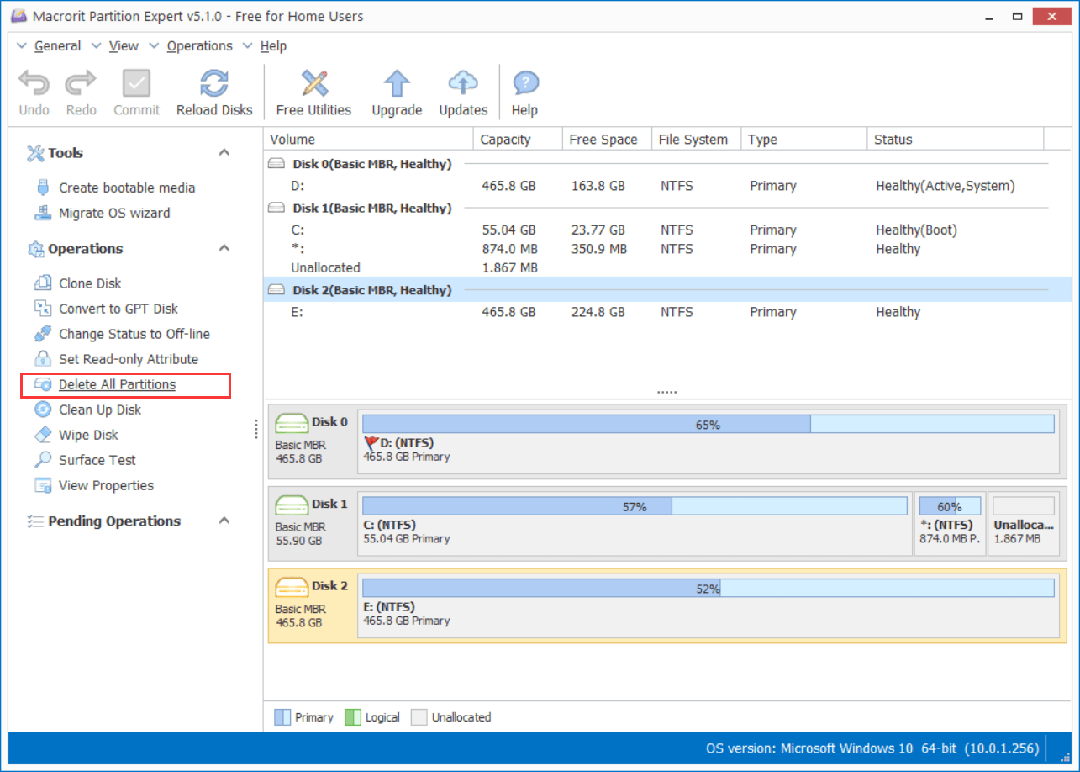
WARNING
although deleted partitions can be recovered by some software, we still recommend you to do a backup on important file
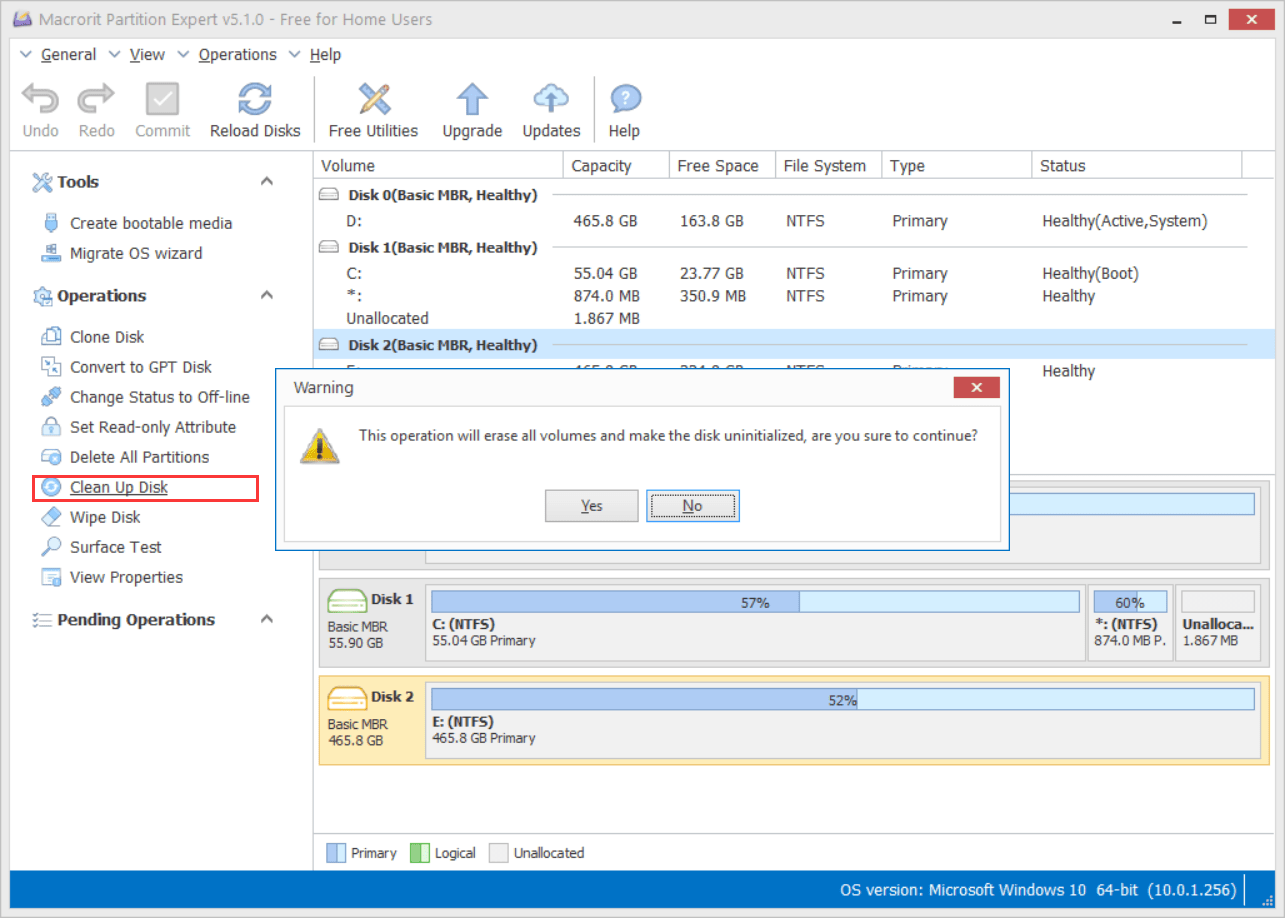
Clean up Disk
What's will this function do?
- Remove all the volumes
- Uninitialized the disk
Steps of cleaning up disk:
- Click on a disk and click Clean up disk
- Click Yes to the confirmation message and click Commit
An uninitialized disk cannot be used, Windows File Explorer won't list the disk either
Only when initializing disk can we make a disk to GPT or MBR
Delete all VS Cleanup VS Wipe
What are the differences between 'Delete all partitions', 'Cleanup disk' and 'Wipe disk'?
| Method | Recovery Chance | |
|---|---|---|
| Delete all | mark space available | High |
| Clean up | erase headers | Low |
| Wipe | overwrite sector | No |
Those three methods have different usages:
- Delete: empty disk, re-format
- Clean up: mainly for initializing a disk
- Wipe: thoroughly remove everything beyond recovery
Initialize
Option only available on an Uninitialized disk
Steps to initialize a disk:
- Click on the uninitialized disk and click Initialize
- Choose MBR or GPT from the partitioning scheme
- Click OK and Commit
You can use the 'Clean up disk' function to empty a disk and un-initialize a disk and change disk to MBR or GPT, or you can convert an MBR disk to GPT disk without data loss
Online/Offline disk
Function available when a disk is off-line/on-line
No need to click Commit, directly take action after confirmed
Off-line disks cannot be recognized by Windows File Explorer, but Disk Management and diskpart.exe command prompt tool are able to detect the status
Off-line disk is not removing anything from the disk, just mark that disk not connecting the computer, when you re-online the disk, everything stays the same
When online a disk, Windows will open a window in File Explorer to show the root folder of the disk
System disk cannot be off-lined, so when you click on the system disk, this option is not available, you won't see this option if there's only system disk on the computer, but you'll find it when you connected any external hard drives
View Disk Properties
Disk Properties contain:
- Produce Name
- Status
- Signature
- Total sector
- Total capacity
- Sector size
- Cylinders
- Tracks per cylinder
- Sectors per track
Set Disk to Read-only/Writable
Option only available on non-system disk
If you don't want someone to change data on your external hard drive, you can set it to Read-only, and then writable again when you get your drive back
Steps to set read-only disk:
- Click on a disk and choose the option Set Read-only Attribute
- Click Yes to the confirmation message
This function would not require the 'Commit' step, when you confirmed, it completes the operation
WARNING
Only when the disk is not in use, you can set the Read-only attribute