Table of Content
- How to download the portable edition?
- How to create bootable Data Wiper?
- How to use bootable Data Wiper?
- Notes and Tips
Data Wiper is the bootable and portable hard drive wipe program to wipe securely wipe disk with built-in DoD wiping methods. In this page, we’ll guide you through the steps of downloading the portable edition and make the software bootable
How to download the portable edition?
From the Data Wiper product page and the download page we can get the portable edition, just hover on the download button and choose the portable package to download. It will take about less than a minute to complete due to the package is really light weight.
Unzip the package and you’ll get the 32-bit and 64-bit version, run the corresponding one according to your system, in the main interface, we can make this software bootable.
How to create bootable Data Wiper?
Bootable Data Wiper can be used when system fails to boot due to hard drive errors or corruption. Prepare a blank CD, DVD, or USB, don’t need the big capacity one, just around 500M will do, it’s about 300M of the ISO file.
Steps to create bootable Data Wiper:
- Click on the Create bootable media button at the top nav bar
- And click Next to create WinPE bootable media
- Choose a path for the ISO file and then click Next to create
The process may take minutes, then click Finish and you’ll find the ISO file named with Data Wiper is created in the path you chosen.
This is not the final step, burning the ISO file to CD, or USB is the target. Data Wiper Now doesn’t provide burning feature, but Windows has a good support for burning ISO to CD/DVD, so just right-click on the file and choose the default Burn option to run. Or if you’re using USB instead, try Rufus, the free portable USB burning program.
How to use bootable Data Wiper?
After the bootable program is created, backup all your important stuff, if it’s the broken hard drive you want to wipe, you can skip this, then shutdown the target computer and plug in the bootable USB or insert the CD, we’ll start to wipe the hard drive from WinPE modal with the following steps:
- Start the computer and press Fx (mostly it’s F2 key, but different motherboard may vary) to go into the BIOS setting, then go the boot menu and choose to boot from USB or CD, Save and Exit
- Save and Exit will reboot the computer, then BIOS is booting into WinPE Data Wiper, in th main interface of which you can wipe everything on the hard drive, even the operating system
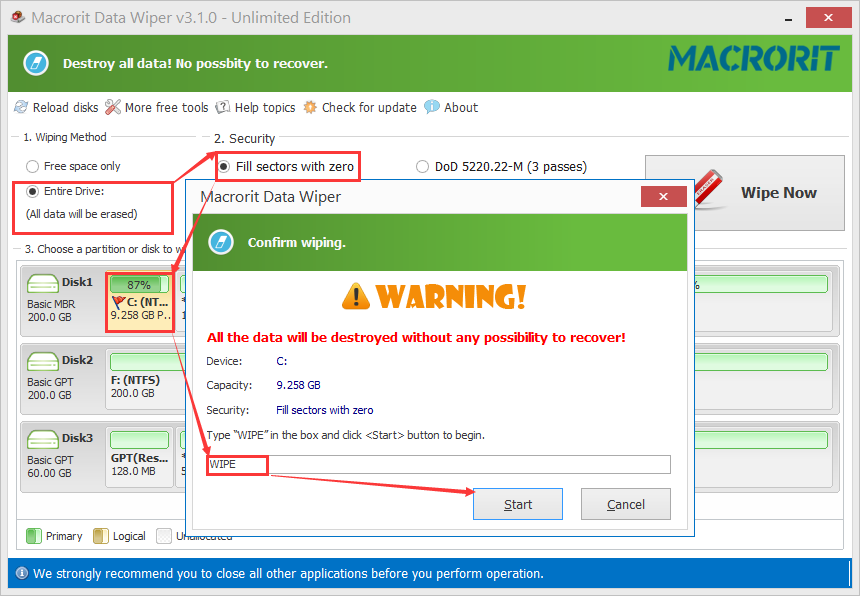
- Click on the free space or entire disk (drive) as the target and choose one wiping method from the listed five kinds of erasing scheme, of course, the DoD wiping methods are included, then click on the disk or partition/volume/drive you want to wipe and click on the huge Wipe Now button
- Data Wiper will ask for confirmation before wiping, confirm it and input the keyword
Wipeto start
Notes and Tips
Although we have Cancel-at-Will Technology, it’s not the Data Wiper software, its for the Partition Expert software only. In Data Wiper, you’re free to cancel the operation, but what’s been wiped cannot be restored.
Wiping free space is much faster than wiping the entire drive even on the same wiping plan, so if you’ve already deleted everything on the drive, Wipe Free Space will be a good choice to clean up hard drive data.