Disable and Low Disk Space Warning message in Windows 10 (7) and Fix this problem thoroughly
Low disk space in Windows 10 are annoying after the anniversary update, we can disable low disk space warning message in regedit, but still don't fix this problem; we can do some cleaning on low disk space partition, but that methods won't last long; we can extend partition on low disk space drive with much free space from other partitions, and that'll will fix this problem with ease
We'll guide on how to disable low disk space warning message in Windows 7, Windows 8 and Windows 10, might be different in each system, read on
Disable the low disk space warning message
In Windows 7 and Windows 8, steps are the same in regedit on removing low disk space warning message:
- Press Windows + R to open Run box, and type "Regedit", press Enter to run; or you can press Start bottom and run regedit.exe as administrator
- Navigate to:
HKEY_CURRENT_USER\Software\Microsoft\ Windows\CurrentVersion\Policies\Explorer - Right-click on a blank area under "NoDriveTypeAutoRun" or any other blank area, click "New >> DWORD Value"
- Type NoLowDiscSpaceChecks to name it, press enter to run open it
- Assign the value to 1
- Restart the computer

That's for Windows 7, and Windows 8 disabling low disk space warning, you must know the warning message is to inform you no more files can be added to this drive, if it's system partition, performance might have been infected
The NoLowDiskSpaceChecks method that works for windows vista, windows 7, and windows 8 does not work with windows 10
How can I get rid of this? It is super annoying
Windows changed some paths and names of from Windows 8, so the steps above will not work for Windows, how to disable the low disk space warning messages in Windows 10, navigate to the path in regedit. I don't have that path in my VMware, so I share this solution from NEOWIN.net here
Login as "Administrator" LowDiskMinimumMBytes DWORD 0 --> HKEY_LOCAL_MACHINE\Software\Microsoft\Windows Search\Gather
Then
HKEY_LOCAL_MACHINE\Software\Microsoft\Windows Search\Gathering Managertake ownership of "Gathering Manager" and assign the ACL rights for the local administrator account (NOT a user account). Modify "BackOffLowDiskThresholdMB" set to 0x00 (0)
(Recommended)
Restore ownership and ACL to the way they were. Not required,.
Ensure that your NoLowDiskSpaceChecks value is DWORD and not string or another type:
HKCU\Software\Microsoft\Windows\CurrentVersion\Policies\Explorer\NoLowDiskSpaceChecks = DWORD 0x01
Low Disk Space Windows 10 HP
Low disk space warning is common in HP computers, not because HP computers are not good, but there're many other files take too much space, HP homepage guide us on how to free up disk space to solve low disk space problem, the following are some tips:
- Emptying the recycle bin; or when you deleting file next time, press Shift + Delete to delete files forever, instead of putting it to recycle bin
- Deleting temporary files and directories
- Removing unwanted programs; Navigate to: control panel >> view by small icon >> Programs and Features. Click "Uninstall" on unwanted programs.
- Adjusting system restore settings
- Confirming that enough hard drive space is available; Press Windows + E to open file explorer, see how much free space available in the drive running on low disk space.
Fix Low Disk Space Warning with Partition Software
Cleaning up files on the partition with low disk space is an efficient way to free up disk space in Windows 10, but won't last long, because the maximum partition size in that value in limited, you have to do the cleaning regularly. Increase the maximum partition size is the best solution to solve low disk space warning problem. That's especially important for C Drive, the system partition. Just imagine that, when you're playing games with full screen, low disk space warning message shows at the corner, where you have function shortcuts, how annoying will that be?
Take C Drive is running of space for example, Fix Low disk space warning in Partition software steps:
- Download Partition software – Macrorit Partition Expert, install it and run
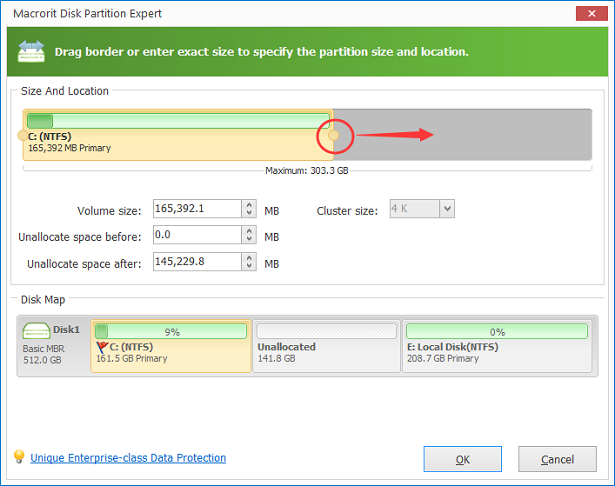
- In the main interface, check which partition has enough free space, in my case, I will choose D Drive, click D Drive and Resize/Move it
- You can see a new window popup, it's the resizing window, we can resize D partition by using the handles on each side, click on the left handle, drag it to the right, just like the screenshot shows, and free space are split from D Drive, click OK
- Click C Drive, Resize/Move it, and drag the handle on the right side to the very end, you can see the unallocated space is merged into C Drive below, click OK, and Commit all the operations
Open file explorer again, you can see the maximum size in C Drive in enlarged. Now you won't get that alert again even when you didn't disable it in regedit. If your default download path has not changed, you can add more space to system partition for download purpose, but we still recommend changing it to another partition