Can't resize partition on Windows 10
When we say can’t resize partition we mostly mean can’t extend a volume that is running out of space with the default partition manager - Disk Management, and there’re situations that not only the Extend Volume option can’t work but also the Shrink Volume option can’t work either.
In this page, we’ll fix both of the problems with the conventional way and the software method
Can't Extend Volume
This is the common problem in Disk Management when some partition (C Drive) is on low disk space, the Extend Volume option is grayed out while other partitions still have plenty of free space. Here’re the solutions:
Disk Management Extend Volume
Disk Management requires continuous unallocated space to the partition you’d like to extend, so when the Extend Volume option grayed out, we have to delete the partition next to it so we can create continuous unallocated space, you may argue that the Shrink Volume option too can make space unallocated, why don’t I use that option instead
Well, Shrink Volume is capable of creating unallocated space, but the created one cannot be used for extending any volume on a basic disk. If you’re using a dynamic disk, this option is perfect for extending volumes. This solution is for most of the basic disks
Use the following steps to activate the Extend Volume option in Disk Management:
- Press Windows+R to and type
diskmgmt.mscto open Disk Management - Back up the partition you’re about to delete
- Right-click on the partition next to C Drive (always be the D Drive) click - Delete Volume…
- Confirm and after this partition becomes unallocated space, right-click the target partition and the Extend Volume option is activated
- Click on the option and follow the guide of Extend Volume Wizard
Extend Volume problems
You may have found problems with this solution:
- There’s no free space on this disk to back up the partition we’re going to delete
- The partition next to C Drive is too running out of space and can’t be deleted
- Backup and restore takes unreasonable time when the partition size is very large
- Extend Volume still grays out even when there’s unallocated space followed
- What if I only have free space on G Drive, Do I have to delete all the D, E, F Drive?
Those are all the problems of using Disk Management Extend Volume option, mainly of which is that we don’t want to delete other partitions just for creating unallocated space, that doesn’t make sense, what if all I want is 20GB free space for C Drive, does that mean I have to delete the entire 500GB D Drive? No, that’s not how things work out, we definitely have alternative solutions
Partition Expert Resize Move Volume
The alternative solution we’re talking about is to use third-party partition managing software, Partition Expert, for example, to move free space from one partition to another partition without data loss and saves the time of backing thing up and restoring it afterwards, Download Partition Expert and get ready for extending volume:
- Run the program and click Yes to the UAC dialog to allow Partition Expert loading the disk map
- Click on the partition with enough free space, no matter it’s next to C Drive or not, G Drive for example and click Resize/Move Volume
- In the resize window hold the handle on the left side of the partition bar and drag it to the right to create unallocated space. Click OK when you get enough
- Click on the partition between C Drive and the unallocated space and click Resize/Move Volume again, this time we drag the entire partition to the end and click OK, repeat this step until we get unallocated space next to C Drive
- Now click on C Drive and Resize it, drag the right side handle to the end and Click OK, Commit to performing all the pending operations
Partition Expert Advantages
After extending volume with Partition Expert, we found that this disk managing program has many advantages that Disk Management doesn’t have:
- During all the operations, no backup and restore step, saved much time
- No deletion on any partitions to create unallocated space
- Resize and move operations are easy to understand and perform
- Even the free space in at the end of the disk, middle positioned partitions are not affected
- Really fast and safe, nothing lost after extending
Can't Shrink Volume
Shrink volume is another way of creating unallocated space and resize partition, but check the following error message, even there’s plenty of free space on the target partition, the Shrink Volume option still can’t work
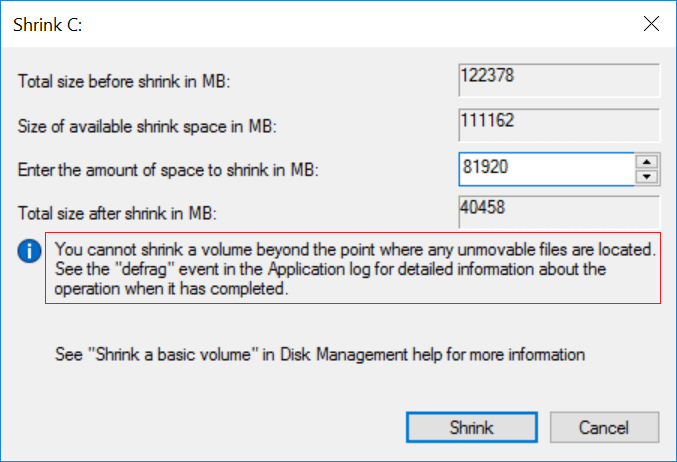
The reason of this error is that there’re unmovable files are located on this volume, but we have solution on how to fix the Shrink Volume option fails to work in Disk Management, please click on to read more
Disk Management fix Shrink Volume problem
In fact, there’s no solution to fix this in Disk Management after it shows this error unless you decided to deleted all the partitions and reinstall the system or reinstall all the partition
But that may cause serious problem especially when there are still valuable data on the disk, delete partitions and re-partition just cost too much for a simple task like Shrink Volume, again, that’s not what we want
We do have another way to fix this instead of using partition manager software, which you can find from the linked page, but just for your reference, we’ll show how simple it is to shrink a volume with Partition Expert
Shrink Volume with Partition Expert
- Run the program and click on the target partition
- Click Resize/Move Volume
- Hold and drag any handle on the partition bar
- Click OK and Commit
Simple steps, right?
Hope this tutorial may have some help to resize partitions on Windows 10