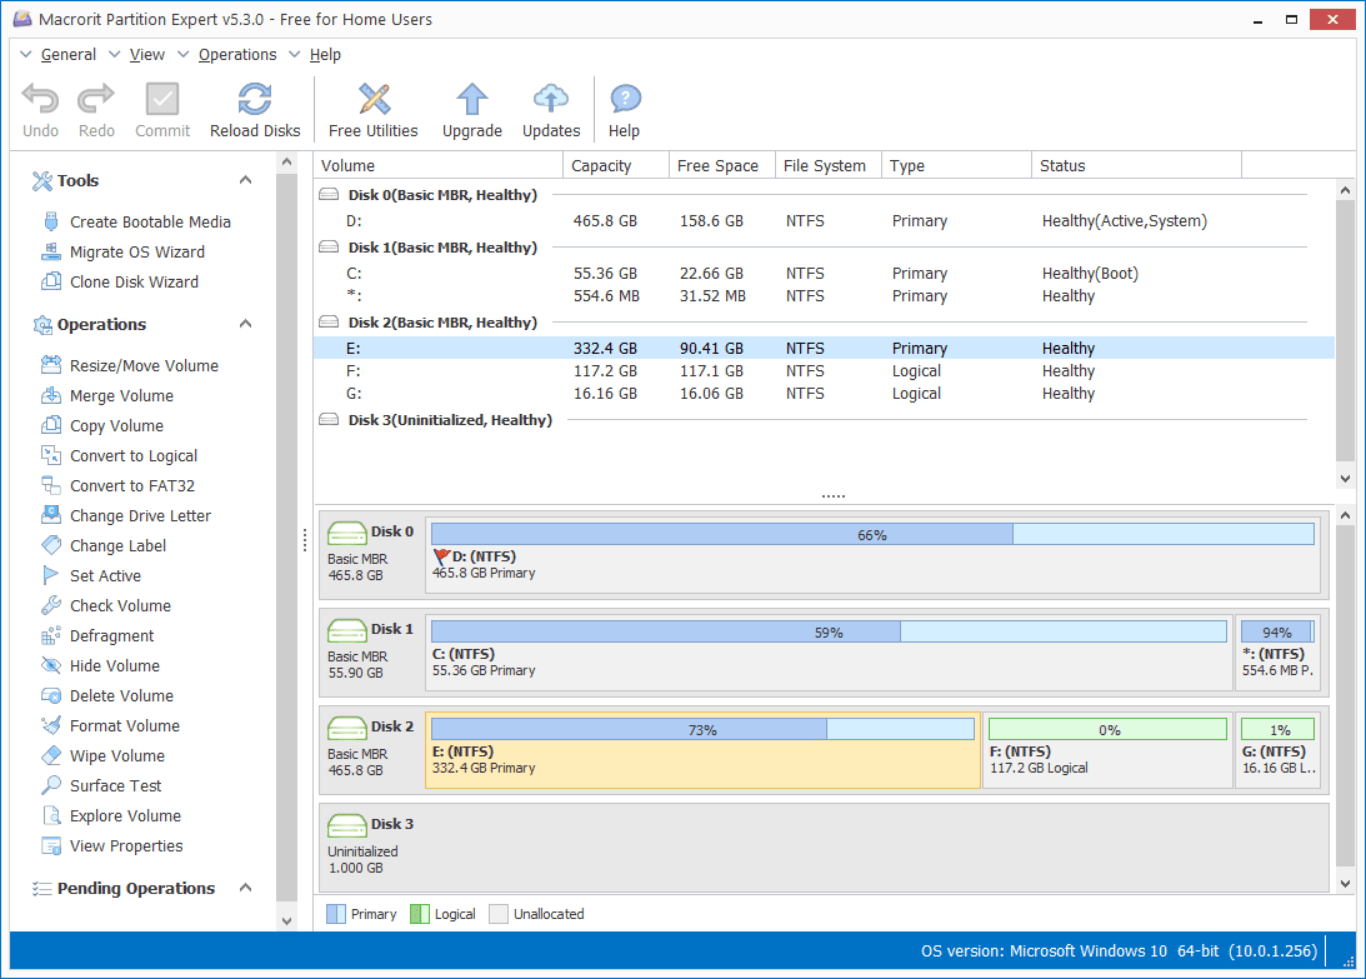
Extend NTFS partition
Windows Disk Management and Diskpart.exe tools are able to extend a volume when unallocated space is continuously to the partition you want to extend. Unfortunately, unallocated space isn’t always right behind the target partition, especially when the partition we shrank is the next drive to C Drive, the system partition for an instance. Besides, for most of the cased, there’s no unallocated space on the disk at all, we had already allocated all of them to partitions.
About Unallocated space
As you may have known that both Shrink Volume and Delete Volume can create unallocated space, the reason we Shrink volume instead of Delete volume is that we don’t want to delete any of the existing data on any drives. So it’s only a good idea when we have data move to other partition or when the partition is empty for deleting, and therefore it’s a bad option for extending partition when the partition is full or cannot be deleted.
Here’s another situation, C Drive is full, D Drive is also full, but E Drive is empty, it’s okay for us to delete E Drive and make it empty, then how can we move it next to C Drive when Disk Manage doesn’t provide Move Volume or Move free space function?
Disk Management or Diskpart
Neither Disk Management nor Dispart.exe has the feature or command to move data.
That’s a common case in disk-map, and the free space and unallocated space is always at the end of the disk while many partitions created between C Drive and unallocated space. It’s not really a matter of partitions, it’s the position of unallocated space matters.
So how to extend?
This method works on NTFS, FAT32, exFAT partition:
download Partition Expert, run it from the portable package
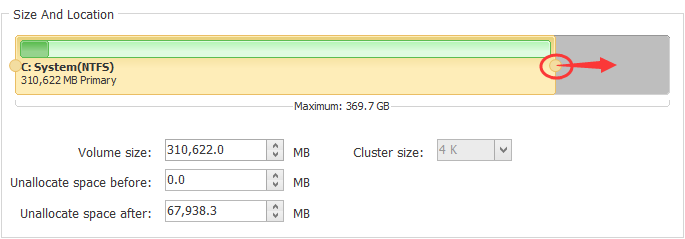
To Shrink a volume
please click on the target partition first and then:
Click Resize/Move volume, then drag the handle to shrink
Or you can just type in the specific desired size to shrink. Then the partition capacity is decreased, in the main disk-map, you can also preview that unallocated space is created at the same time.

To Extend a volume
Now we have newly created unallocated space which can be used for extending, so this time we check the position of it, it is right after the partition we want to extend or is it separated by other partition(s)?
For the first case, we can directly right-click on the target partition and:
choose Resize/Move volume and drag the handle to the right to the end
Then click OK and Commit.
As for the second case, we can click on the partition in front of unallocated space and again choose the function to
Resize/Move volume to move:
#in the opened window
Click and hold the partition bar and drag it the end
Then unallocated space will automatically move to the head of the partition, click OK and repeat this step on other partitions on the way until we moved this unallocated space to the right position.
Those steps may be seemed troublesome, but it only takes a few click to extend a volume and what’s the most important thing is, we extended a volume without data loss. You definitely have found that no partitions are deleted, right?
So, that’s how Partition Expert works. Feel free to download and have a try.