How to fix Windows 10 C Drive full problem after upgrade
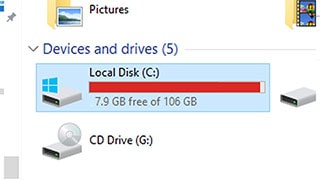
In the previous page “Windows 10 April update (1803) creates new partition” we found that Windows 10 C Drive is full or other partition is about to run out of space, since we can’t delete or format the partition auto created by this upgrade, we can extend C Drive with free space from other large capacity partitions and fix the low disk space problem without removing data recovery or OEM partitions
The problem: Extend Volume option grayed out
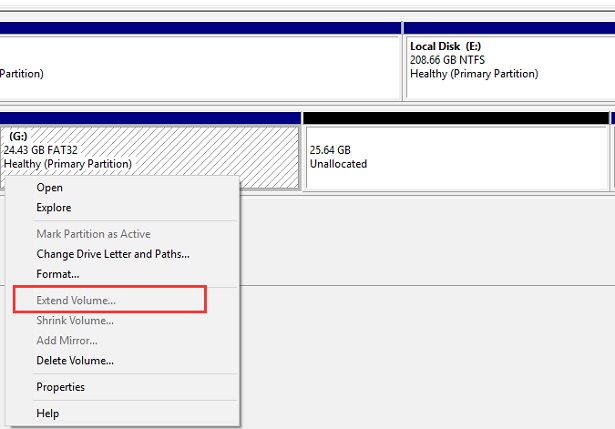
Talking about extend volume, the option in Disk Management called ‘Extend Volume’ came into our mind, we can use that function to fix low disk space problem, but when open this tool only to find that this function is greyed out. How to active it? According to Microsoft, there’re two conditions for an activate Extend Volume option:
- There shall be contiguous unallocated space to the partition you want to extend
- The file system of that partition shall be NTFS
That’s to say, if we don’t have unallocated space followed to C drive or when there’s no unallocated space at all, we can’t use this function. How about we cut some free space, say, shrink free space from D Drive, or other partition with enough empty space, to extend C Drive? No, the unallocated space should right next to C Drive, if it’s not, the Extend Volume option will still be greyed out, since new unallocated space created by shrinking other partition is not next to C Drive. OK, don’t be upset, we still get a solution, actually, two solutions:
- One is to extend volume using free space from other partition on the same disk with enough free space
- The other is to merge C Drive and another drive, both functions will keep data on the disk safe.
Download this Disk Management alternative software, install it or directly run it from the 32-bit or 64-bit portable package.
The First solution: Extend Volume in Partition Expert
In Partition Expert’s main interface, let check if we have unallocated space on the disk, which is essential for extending C Drive, if we don’t have it or don’t have enough of it, we can create some; if there’s unallocated space on the disk but not next to C Drive, we can move it. The following step will guide us how to create and move unallocated space to the target position
1. Create unallocated space
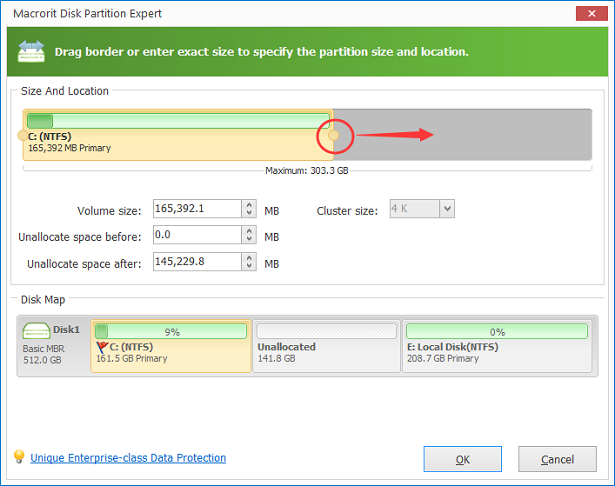
Step 1 Check the disk map and click on a partition with much free space on it, the partition should be on the same disk of C Drive, always be the ‘Disk 0’ disk, and then choose the function ‘Resize/Move volume’ from the side bar
Step 2 In the resize window, that partition has two handles (little yellow circle) on each side, they’re click-able and drag-able, we can use them to resize shrink this partition for free space, click on the handle on the left side, drag it rightwards and you’ll see unallocated space is created in the mini disk-map below, and the number of partition size is also change simultaneously in the middle section, click ‘OK’ when you have enough free space (it’s the same effect if you click on the handle on the right side and drag it leftwards)
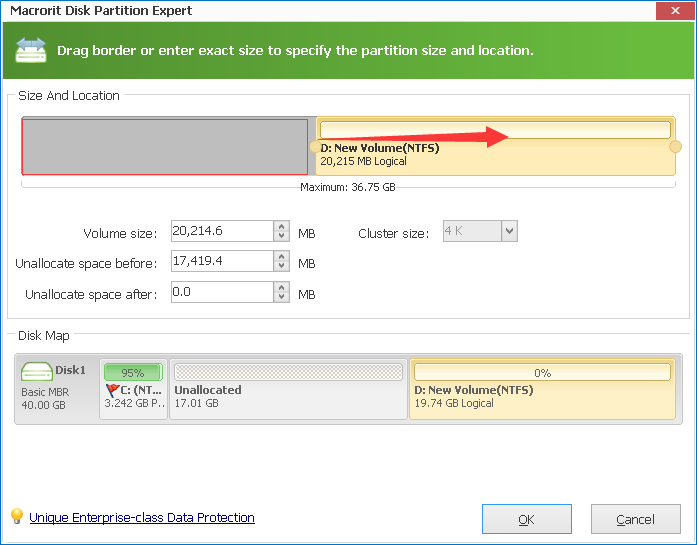
Now we created unallocated space on the disk, it’s time to move next to C Drive
2. Move unallocated space
If you shrank D Drive (which is always next to C Drive) from the left side, you don’t have to move unallocated space, just jump to the extend C Drive step; if you shrank D Drive or the partition from the right side, do as follow to move it forwards
Step 1 Click on the partition ahead of unallocated space and choose ‘Resize/Move volume’ function
Step 2 In the resize window drag the entire partition to the right, unallocated space will automatically move the head, you can check the preview effect in the mini disk-map, click ‘OK’ to close this window. (This time we don’t use the two handles, just hover the mouse on the middle of partition bar, it will become a cross arrow, which means you can now drag the entire partition)
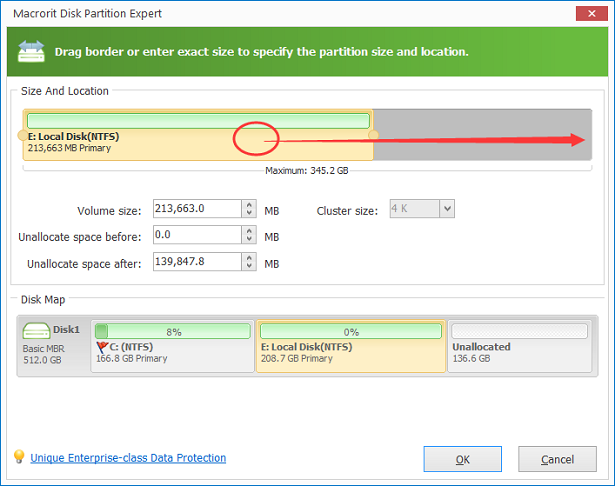
If unallocated space is still not next to C Drive, we can repeat this step until we it stays in the right position. If the large partition you’re about to shrink is at the end of disk, say, there are C, D, E, F, G five partition on the disk, G is the one with very much free space, the move unallocated space is somewhat troublesome, we can use the merge volume method instead.
3. Extend C Drive with unallocated space
Now we get unallocated space next to C Drive, the Extend Volume in Disk Management is now activated, we can use that function, or just use Partition Expert to finish this operation, we’ll keep using Partition Expert, no need to run Disk Management again
Step 1 Right-click on C Drive and select ‘Resize/Move volume’, in the new window, we drag the handle on the right side to the end and unallocated space is merged into C Drive, you can tell that from the preview of the mini disk-map, click ‘OK’ to close this window
Step 2 Then click ‘Commit’ in the main interface and Partition Expert will extend this volume within minutes or a hour, depends on how much free space you shrank and extended
This method can be used when the partition we’re about to shrink is not far away from C Drive, say, D Drive or E Drive, and we only want part of that partition instead of the entire partition. If the target partition is at the very end of the disk, and there are many other partitions between it and C Drive, we can use the merge volume method instead
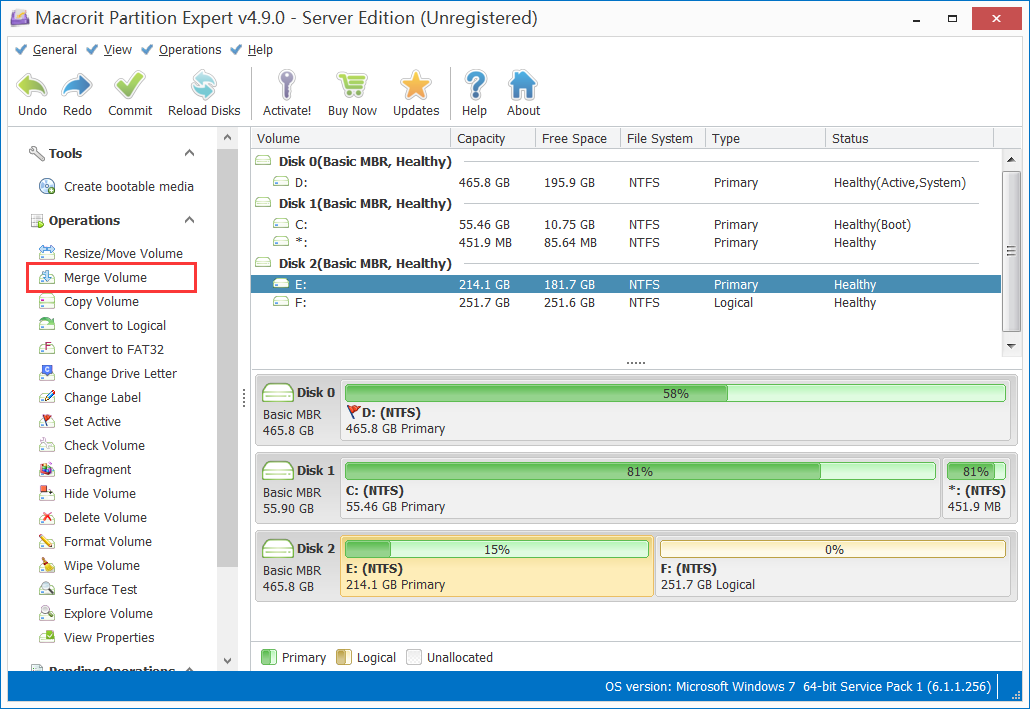
The Second method: Merge Volume
We can merge C Drive and other partition when low disk space happens to system partition, the following steps tells us how to merge partitions
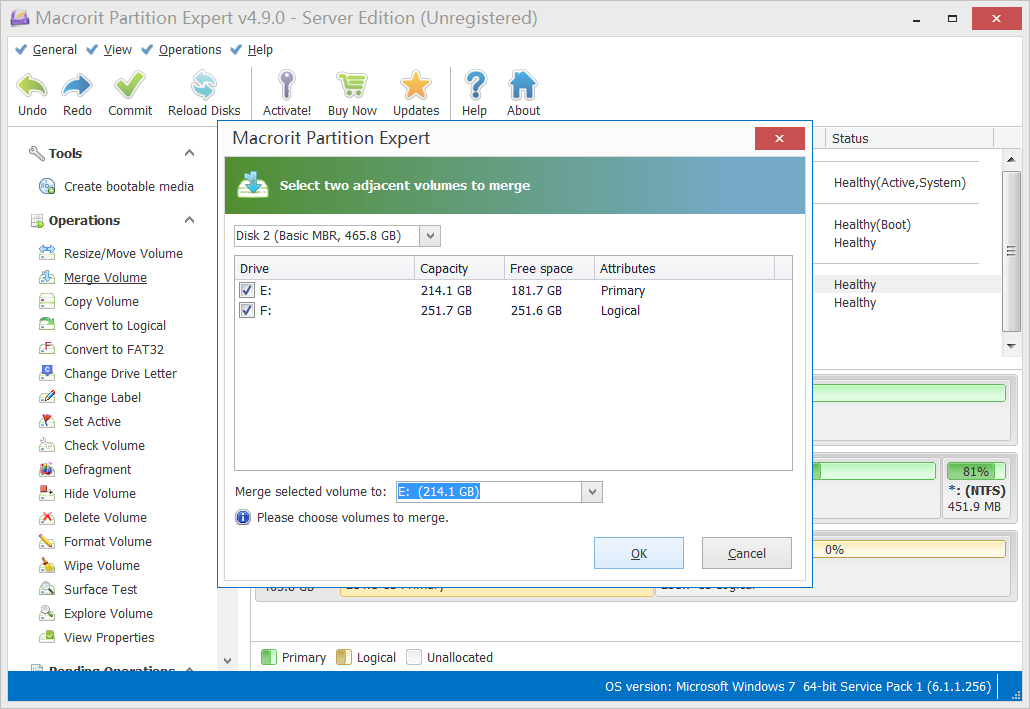
Step 1 Click on C Drive and choose ‘Merge volume’ function, in the pop-up window, click on a partition to merge and define the destination partition, we’ll merge two volume to C Drive, so click on it and click ‘OK’
Step 2 Then click ‘Commit’ in the main window and Partition Expert will starts to merge them
But here’s one problem, what if we don’t merge the entire partition, but part of it, the entire volume is too big for C Drive, we don’t want to waste the rest of it, how can we merge just 20G, for instance, to C Drive?
Shrink the partition and create a new partition to merge
We can use the previous step to shrink a large partition for 20GB, and click on the 20GB unallocated space, choose ‘Create Volume’ function to create a partition just for the purpose of merging to C Drive

Conclusion
Both of the two methods are aim for keeping data intact on the disk, they may seem complicated but they’re really easy to perform and follow, just try it out and you’ll find it’s easy to use and fast in operations, besides, it’s free.
If you don’t have important Data on D Drive, or any other partition next to C Drive, you can just delete the entire D Drive to create unallocated space and active the ‘Extend Volume’ option for C Drive in Windows Disk Management
Although we have data roll-back technology built-in, we do recommend you to backup data on the partitions you’re about to operate