Partition a hard drive in Windows 10 disk management
"After installing Windows 10, we need to partition hard drive in Disk Management to distribute more free space for Windows 10 future use. How to partition hard drive in disk management? Can we partition it without data loss? I heard that you had to format hard drive to create new volume, can we do partition it without data loss? "
If you have unallocated space on your hard drive, it's ok to create partition with it without data loss, but if you have no such space available, you have to split exist partition into partitions, in Windows 10 Disk Management, Delete Volume is the function you shall use, which will not keep data when operating. We'll guide you how to do it without data loss in this page.
In Windows 10 Disk Management
1. Create a new Partition
Steps of creating a new partition in Windows 10 Disk Management:
- Press Windows bottom and type disk management in search box to open Disk Management.
- Right-click on unallocated space and select New Simple Volume; follow New Simple Volume Wizard.
- Confirm Simple Volume size, assign drive letter, format volume with file system, allocate unit size (cluster size), Volume label, and perform a quick format, Finish.
When a new window pops up, it means you succeed, this window is file explorer of the volume you created.

If you don't have unallocated space, follow the steps below:
- Right- click one big size partition, select Shrink Volume
- Enter the amount of size to shrink in MB: ***MB; and click Shrink
Now you have unallocated space in primary partition now, or free space in extended partition.
2. Merge partitions
Windows 10 Disk Management has no function called Merge Partitions, but we simulate it in Disk Management, without the help of any third-party partition software, the thoery is to maunally copy everything from one partition to another, delete one partition, merge the free space to another
Functions we’ll be using to merge partitions:
- Delete Volume
- Extend Volume
Steps of merging volume using Disk Management:
- Press Windows + E to open File Explorer, or in Disk Management right-click on the target partition and click Explore
- Press Ctrl+A to select all files and navigate into another Drive you’d like to merge, right-click on an empty (blank) area and choose New and choose Folder, name it as “Merged Drive” or any other name you prefer
- Double-click to go into that folder and Ctrl+V to paste everything there, time spend on this progress may vary according to the file size
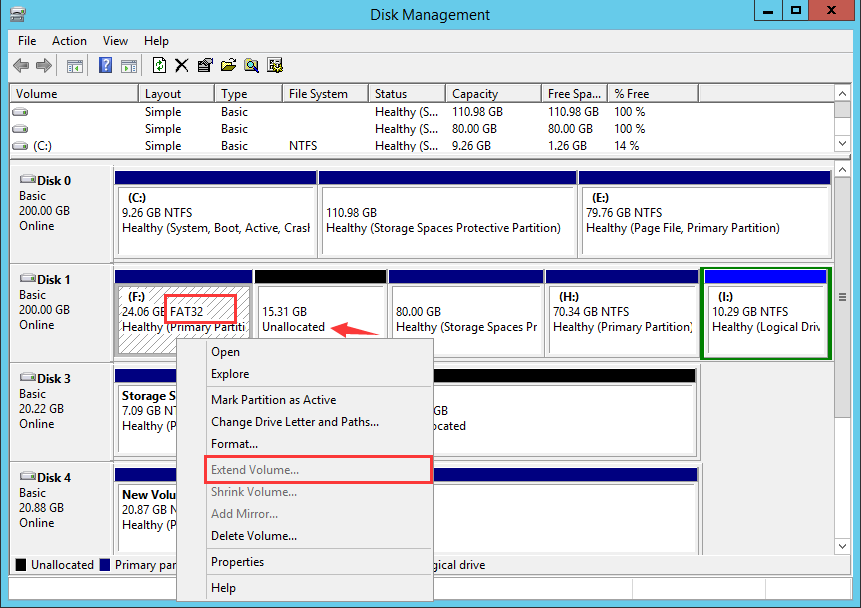
- Then in Disk Management, right-click on the we copied data from and choose Delete Volume and confirm when prompted with the warning message to make this area unallocated
- Then right-click on the other partition and choose Extend Volume to evoke to Extend Volume Wizard
By doing so, we can merge two partitions in Disk Management
What’s the problem with method?
- Two partitions have to be right next to each other
- Only the left side partition can use the Extend Volume function
- Only NTFS file system can use the Extend Volume function
Try to merge partition in a easier way with Partition Expert
Another way of merging partitions:
We can create VHD file in a partition and attach it to the disk map in Disk Management, since the VHD drive is also treated as a file in File Explorer, it can be moved, cut and pasted to other drives, say if we’d like to move it from E Drive to D Drive, simply cut and pasted it to D Drive, attach this file again to list it in disk map, although it’s still a new drive in File Explorer and Disk Management (even with the same drive letter), free space in E Drive is increased
Guides on how to manage VHD disks
Use command prompt
Another way to partition hard drive in Windows 10 is to use command prompt: diskpart. Here are the steps to create volume using command prompt, along with shrink partition and extend volume in Windows 10 CMD
Steps to create partition in Windows 10 using command prompt
- 1. Press Win+R to Open Run Box, type cmd
- 2. type diskpart and click Yes when UAC window Shows, type the following in order
> list disk
> sel disk 1
> list partition
> sel partition 1
> ass
> exit
- 3. Do as follow to shrink partition in diskpart if you don't have free space or unallocated space on your hard drive.
> list disk
> sel disk 1
> list partition
> sel partition 1
> shrink
> or shrink desired=20480
> exit
shrink directly will autmoatically shrink partition by Windows, you can also type shrink desired=*** to define your own partition size.
Manager partitions in Disk management or command prompt : diskpart can keep data intact on the operation of create and shrink volume, but not extend volume when the free space or unallocated space is not next to the partition you want to extend, for example, you want to extend C Drive, the system partition, but free space is right behind E partition, then Extend Volume gray out in right-click menu or C Drive, there's no way to make this function active but to delete D partition, the partition next to C Drive, and make D partition as continues unallocated space to C Drive. So we shall try another system utility to perform the same step without data loss.
Use Partition Expert
Partition Hard Drive in Partition Expert is easier than in Disk Management or Command Prompt diskpart. You can keep data safe no matter you are creating, shrinking or extending partitions.
Check the following link to :
- Extend partition without data loss
- How to shrink Partition in Windows 10
- How to Create Volume in Windows 10
- How to merge partition with unallocated space
Although all the screenshots are from Windows 10, you can still use this guide on Windows XP, Windows Vista, 7/8/8.1, almost the same