One command to fix 100% disk usage problem after Windows 10 updates
Windows 10 updates with 100% disk usage problem on startup while nothing is running, use this command to cancel Windows performance recorder, solution form the Reddit forum and other pieces of advice from Macrorit
Here’s the solution from reddit, with only one command we can fix this problem
Command: wpr -cancel
What is WPR
Before you run this command, here’s some info
It stands for Windows Performance Recorder, before you perform this command, you can check the help info like this
press the start button, type cmd and press enter to open this tool, and then type wpr -help to list the detailed commands it supports, like so:
Usage: wpr options ...

-help                    - Provide command line help information
-profiles                - Enumerates the profile names and descriptions from a profile file
-purgecache              - Purges the dynamic symbols cache
-start                   - Starts one or more profiles
-marker                  - Fires an event marker
-markerflush             - Fires an event marker and flushes the working set
-status                  - Displays status on active recording (if any)
-profiledetails          - Displays the detailed information about a set of profiles
-providers               - Displays detailed information about providers
-cancel                  - Cancels recording initiated via WPR (if any)
-stop                    - Stops recording initiated via WPR (if any) and saves
-flush                   - Flushes logging sessions initiated through WPR (if any)
-log                     - Configure debug logging to the event log
-disablepagingexecutive  - Change the Disable Paging Executive settings
-heaptracingconfig       - Change heap tracing settings for a process
-snapshotconfig          - Change snapshot settings for a process
-capturestateondemand    - Capture states for the configured providers in the current recording
-pmcsources              - Query the list of hardware counters available on the system
-setprofint              - Set sampled profile interval
-profint                 - Query the current profile interval
-resetprofint            - Restores the default profile interval values
-boottrace               - Configures the registry entries for autologger/globallogger sessions
-enableperiodicsnapshot  - Enable Periodic Snapshot for the specified interval and given process id
-disableperiodicsnapshot - Disable Periodic Snapshot for all process
-singlesnapshot          - On demand Snapshot for the specified process
-instancename            - Specifies a name to uniquely identify the tracing instance.
                           Useful when managing multiple concurrent wpr sessions. Must be last parameter.
Or just check the screen-shot below:(click to enlarge)
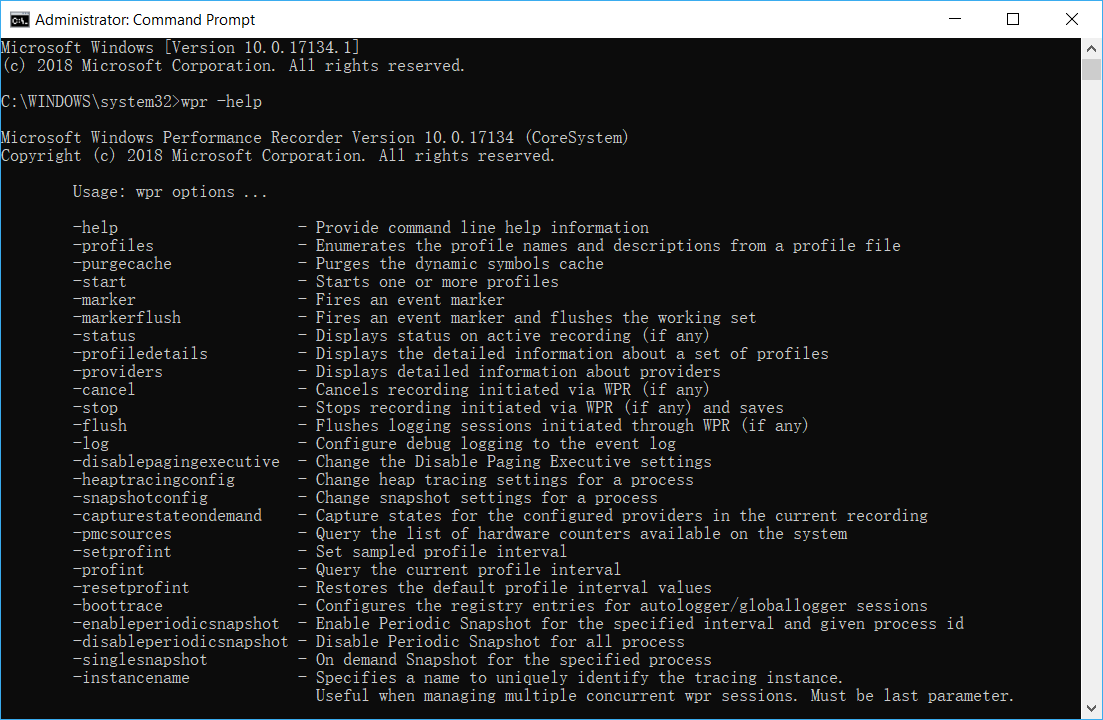
then type wpr -canel to cancel recording initiated via WPR
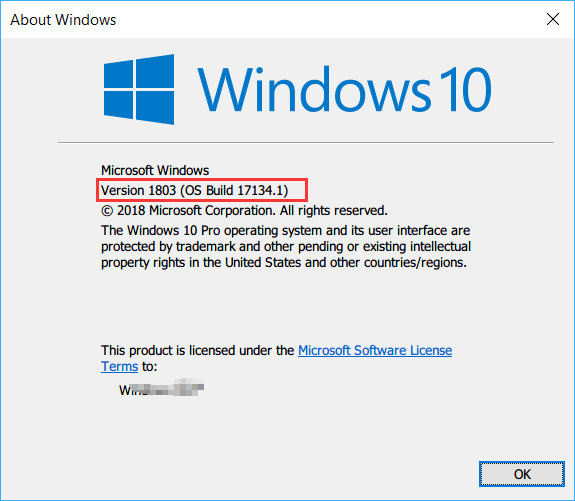
my Windows version is 1803, you can check yours by in the command line tool, or just type the command in the Windows Run dialog box like this:
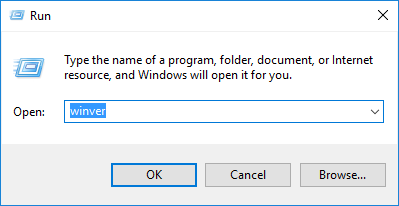
press Windows key + Run to open the dialog and type winver, if it’s 1803, you don’t have to install the WPT tool,
What about other solutions
You may have searched other solutions on 100% disk usage problem on Windows 10 update, like the Fix Your StorAHCI.sys Driver, Change Energy Options from Balanced to High Performance, Change Settings in Google Chrome and Skype, Disable Windows Search, Disable SuperFetch Service, Disable Antivirus Software, Uninstall Any Flash Player Update, Perform a disk check, Reset Virtual Memory, Update your device drivers or even clean install Windows 10
To be honest, I didn’t try all of those solutions except checking the volumes on the disk, I used our own utility Partition Expert to check the partition on the hard drive, you can follow the steps below or just skip this section if the command we mentioned at the begging works for you
Run Partition Expert and click on the partition ( C Drive, e.g.) to proceed when the disk map is loaded in the main interface, click on Check Volume and check both options (Fix found errors and Try to fix found bad sectors), then after seconds Partition Expert will list the log and tell the result in the window, if it says:
Windows has scanned the file system and found no problems.
No further action is required.
You’re free to close the window and exit this program, but if you’re about to try more solutions that you just googled, we strongly recommend you backup the disk or partition before actually editing the Registry, fortunately, Partition Expert has already built-in the copy function for us to backup data
Backup Data in Partition Expert
The following steps are for backup data from one partition to another, you can use this function before you perform some operations to the volumes contain import data
1. Download Partition Expert, install, and run it, or if you don’t want to install it to Windows, feel free to use the portable edition, which has exactly the same functions as the installation one
2. In the main interface, click on the partition you’d like to backup, and plug a blank disk (USB, or an external hard drive), or just create one unallocated space on the same disk if there are no external empty media, then click Copy Volume

3. Click on the target unallocated space and click Next to proceed, then click Finish if the default setting suit you or just manually adjust the target space and drive letter for the new partition (copied volume will create a new partition so you can access the data), and finally commit the operation in the main window
Here’s the complete guide on how to copy volume