How to Extend Volume on Windows Server 2019 (4 ways)
Although Windows Server 2019 embraces hybrid cloud and hyper-converged centers, it’s still a long way to get there, in most of the case, store data on the server disk is still the main steam, which inevitably will have to face the low disk space problem on C Drive as time goes by, or as partition size gains gradually
There're mainly four methods to extend C Drive in Server 2019
Use Disk Management
Disk Management in Server Manager is still the default tool to resize partition and it looks like operations are the same like it was in Server 2016, or at the least the current insider version works the same
In the Server 2019 insider preview build, we still need to ensure unallocated space is right next to C Drive so that the ‘Extend Volume’ option can be clicked (is active), so if there’s no unallocated space on the disk, the ‘Shrink Volume’ method won’t help either, in this case, Disk Management will fail you, try another solution instead
Here’s how to extend C Drive when unallocated space is available at the right position, like the diskmap below:
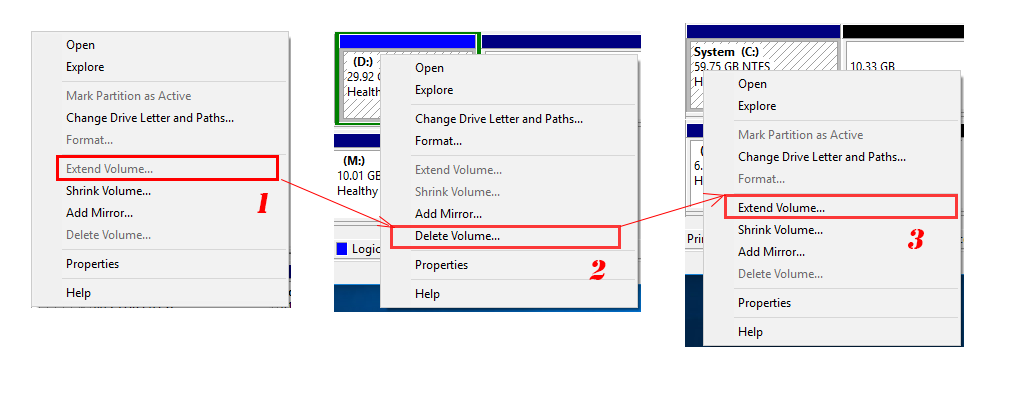
- Firstly, right-click on the Start button and choose ‘Disk Management’ to run this partition manager
- In the Disk map section right-click on C Drive and click ‘Extend Volume…’
- Then follow the guide of ‘Extend Volume Wizard…’
The the new disk map will be like this after extended:
Question: I don’t have unallocated space on the disk, every each of them was distributed when install the new system, my question is, why can’t I use the Shrink Volume option to create unallocated space for C Drive extending?
Answer: Well, to be precise, you can Shrink Volume to created unallocated space, but you cannot use it to extend C, the position of the unallocated space you just created is not right next to C, it’s after D drive instead. In the Windows version we’re testing, Windows still didn’t provide the function ‘Move volume’ for us the move it from the end of D to the end of C. You’ll have to delete the entire D Drive, like once we did in Server 2016, to make unallocated continuous to C and extend C Drive is possible
Diskpart extend C Drive
If you try to extend the system volume in diskpart command line, you may get this error:
“The volume you have selected may not be extended, please select another volume and try again”
we have solution on diskpart fails to extend system partition and the main step is to run diskpart before it boots into Windows
But diskpart has the same problem with Disk Management, or we should say, Windows has it’s limitation to extend volume, unallocated space neighbor to the target partition, if we don’t have available space there, diskpart won’t help on C Drive extending
If you do have meet the conditions, you can extend C Drive of Server 2019 with the commands below in diskpart:
list volume - select volume C - extend size = 10240
Press Enter after each ‘-‘, and that will extend C drive with 10G, change that number to what ever the unallocated space size is
Use Partition Expert
Both Diskpart and Disk Management can be used for NTFS file-system-ed C Drive extending when continuous unallocated space is available on the disk, only diskpart has to run before Windows. Those built-in tools are fast and convenient for Pro user, but in most of the situations, C Drive has no such space followed and nearly all of us don’t want to delete another drive and re-partition it after the extension. So we’d like to use some third-party software to extend C Drive without deleting partitions or, to put it simple, without data loss
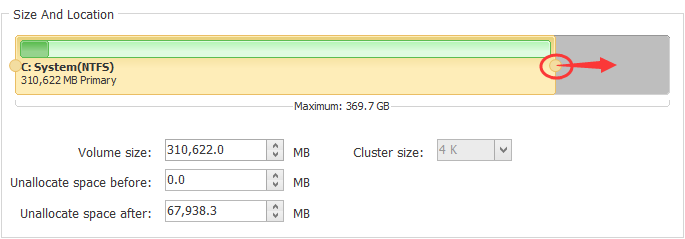
Partition Expert is an all-in-one partition manager, you can use it to completely replace the default Disk Management tool if you’re not using dynamic disk for the Server (Partition Expert currently doesn’t support dynamic disk), why we choose this program is that, it is able to resize partition without data loss even when there’s no unallocated space followed to the target partition, download the portable edition and run the following steps to extend C Drive on the disk below:
In this disk map, we don’t have unallocated space, but we can shrink D or E drive to get some, shrink partition in Partition Expert is different from that in Disk Management, we can shrink the head of the partition instead of only shrink from the end in Disk Management, to shrink a volume, we can:
- Right-click on D Drive and choose the ‘Resize/Move volume’ option
- Then in the resize volume window, D Drive is displayed at the top as a bar, on each side of which, there’re two handlers, one at the head section and the other at the end, we click on the header handler and drag it to the right to create unallocated space ahead of the partition, you can see the preview effect in the mini disk-map at the bottom of the window, once we got enough free space from D, click ‘OK’, and the disk-map in the main window will be like this:
C Driveunallocated spaceD Drive (smaller)E Drive (more free space)
- Then click on C Drive and choose ‘Resize/Move Volume’ function again to open operate C Drive in the resize window. Now we have unallocated space there, we can then drag the bar at the right side to the very end of the bar, then unallocated space is merged into C Drive, the preview section shows that in real-time, click OK and the disk-map will turn to this:
C Drive (with free space from D)D Drive (smaller)E Drive (more free space)
- Now, all the operations are pended in the ‘Pending operations’ section on the left bottom of the sidebar, and the ‘Undo’ button is also available, if you’re not satisfy with the amount of free space just distributed, you can click on it or press Ctrl+Z to undo. And click ‘Commit’ when you confirmed
Press Win+E to open File Explorer (This PC in Windows Server 2019) and C Drive now has more free space, if it was a red bar before resizing, it’s now should be a blue bar, and correspondingly, D Drive has fewer free space while E Drive stays the same, double-click D Drive, you’ll find data in it is still there. You can also use this method to shrink E and extend C, only add one more step, exchange position of D Drive and unallocated space from E, use the ‘Resize/Move volume’ again, drag the entire D partition to the end (hover on D Drive and the mouse cursor will become a cross arrow) instead of dragging the footer handler
Extend C Drive by merging E Drive
Feel free to merge C Drive with another partition, if that partition has less important data in, Partition Expert offers this option in the function list, click on C Drive and click ‘Merge Volume’ and then click E Drive, then OK and Commit
Best option: Partition Extender
When we say the ‘best’, not because Partition Expert is the most powerful or feature-rich partition software, on the contrary, it’s a small utility focusing only on partition extending, it’s the best in the case is that when there’s no unallocated space on the disk at random position, and you don’t want to do shrink-extend step or other complicate stuff, it’s the best tool. We’ll explain how to extend C Drive with the same disk-map
In Partition Expert, we have to shrink D, or E to create unallocated space, of course, you can directly merge C and E into C, but that’s no the topic in the section, in Partition Extender, we can directly extend C Drive like so:
- In the main interface of Partition Extender, click on C Drive and click ‘NEXT’, then you’ll be navigated to the resize window, like which in Partition Expert. Before you perform any operation, let introduce this window real quick, top section is the partition bar, in which there’s a handler, it’s click-able and drag-able; the middle-section has two arrows and two input fields, all are for resizing purpose, at the bottom section is the disk map, for preview purpose
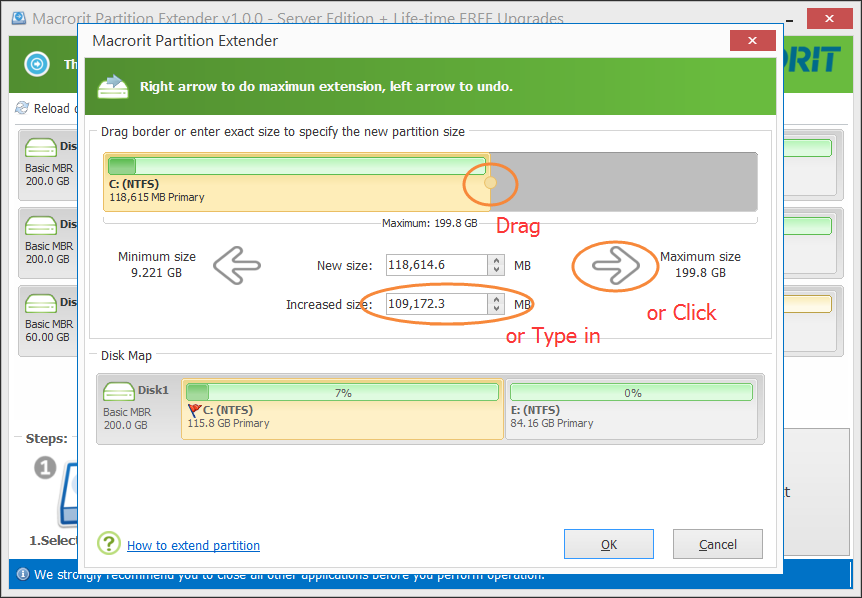
- When first navigate into this window, the right-arrow will blink for 3 times so as to inform you this arrow is click-able, click on it to get maximum free space from D Drive and merge unallocated space (if it’s available), or just drag the handle to extend C Drive manually, check the screenshot above, yes, we can just type in the specific size to enlarge, no matter you dragging, clicking, or inputing, the disk map section will preview it correspondingly
- Then click OK and OK again to actually extend C Drive
You might have noticed that, Partition Extender not only extends partition, but shrink another partition at the same time, of course, free space doesn’t just come from nowhere, what I’m trying to say is that, when you want to shrink a large sized partition and don’t want to do extra step to extender another one, or don’t know how to deal with free space shrank, you can use Partition Extender to manage the Disk
Summary: Use them conditionally
Although we have four options to extend C Drive when low disk space problem happens and we’re the developer those partition software, you can feel free to choose any methods that come handy, for instance, when there’s no important data on D Drive, why don’t we just delete it to make unallocated space for C Drive extending, and create a new partition on the rest of unallocated space won’t bother me. Since Windows Server 2019 is new and only insider version available, it’s not likely for many of the users facing the low disk space problem in a short while, many companies won’t use this build for production either, data on any partitions has a highly possibility of deletion, try to delete or try Partition Expert or Extender for comparison